Configuration guide for the BPS2
BioCASe Provider Software v. 2.3.0
![]() Notice: Be sure that you have followed the Installation guide before starting to configure the software. Specially check that you have all necessary libraries already installed in your system trough the Python Library Tests page.
Notice: Be sure that you have followed the Installation guide before starting to configure the software. Specially check that you have all necessary libraries already installed in your system trough the Python Library Tests page.
The latest version of this document can always be findnd at ![]() http://ww3.bgbm.org/bps2/Configuration
http://ww3.bgbm.org/bps2/Configuration
Modifying your database for ABCD concepts Only read this chapter if you are mapping your database to ABCD (Biological Collection databases)
-
System Administration: System Admin
Datasource Settings: Settings
Connection to the database: DB Connection
Defining the structure of the database: DB Structure
Describing the Data Source with metadata: Metadata
-
General Testing tool for ABCD providers Read this chapter only if you are configuring your database for ABCD.
Using the Advance Query Forms to debug problems with the configuration
Modifying your database for ABCD concepts
![]() Notice: This chapter is only interesting for users mapping their databases to the Conceptual Schema ABCD. We have included it here in the configuration guide because is very common its use, but if you are mapping your database against other schemas you can skip this chapter completely and go directly to Using the Configuration tool
Notice: This chapter is only interesting for users mapping their databases to the Conceptual Schema ABCD. We have included it here in the configuration guide because is very common its use, but if you are mapping your database against other schemas you can skip this chapter completely and go directly to Using the Configuration tool
The Access to Biological Collections Data (ABCD) (![]() http://www.bgbm.org/TDWG/CODATA/Schema/default.htm Schema is an evolving comprehensive standard for the access to and exchange of data about specimens and observations (a.k.a. primary biodiversity data). With it is possible to share your collection data to the GBIF & BioCASE networks. Is not the intention of this document to explain its different parts, but just to give the enough knowledge to map a collection database to this schema.
http://www.bgbm.org/TDWG/CODATA/Schema/default.htm Schema is an evolving comprehensive standard for the access to and exchange of data about specimens and observations (a.k.a. primary biodiversity data). With it is possible to share your collection data to the GBIF & BioCASE networks. Is not the intention of this document to explain its different parts, but just to give the enough knowledge to map a collection database to this schema.
Example structure, the training database
In this chapter we will introduce an example database that can be found in the biocase/examples/trainingDB folder. This database is based on the work from the Centre de Documentació de Biodiversitat Vegetal of Barcelona (Thanks!). It contains some records from a database of a lichen collection in Barcelona but has been greatly modified. We will use it in our further examples. Ii is included as an Access database and as SQL scripts to generate it in MySQL and PostgreSQL. Its structure is as follows:
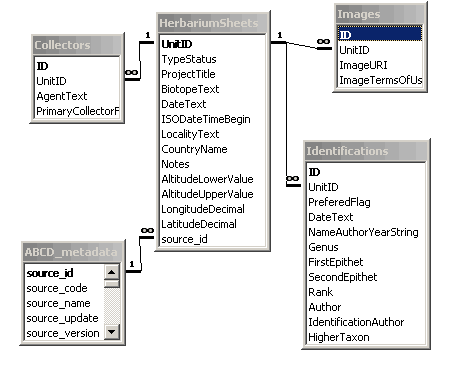
So As you can see it has 5 tables. The HerbariumSheets table is the central one and has the information about every single specimen in the collection, what is called a Unit in ABCD. The other tables contain the collector that collect these units, images of the units and identifications done to the specimens. The ABCD_metadata table has been included in the configuration process to describe the database, we will talk about it later.
This database is configured already as a Datasource in the provider software and is called training. You may take a look to it as a working example.
Modifying your database to provide mandatory ABCD concepts
There are some mandatory elements in the ABCD schema that you will have to provide when mapping your database to ABCD. Most of them refer to metadata describing the collection. Normally collection database do not have information about who is the owner of the database, which institution hold it, etc. This information is necessary to create ABCD documents. You have the possibility to include this information as fixed values in your mapping (we will see later) or to include it in your database and then map them. The second possibility is more desirable because it makes possible to search on this information, and also is much easier to modify the data later if necessary.
You can take this metadata table from the example databases in Access or using the SQL scripts. Because is possible to have more than one data set inside a single database you can specify several records in this table and relate them trough the field MetadataId. Check how it is done in the example database. If you only have one data set and you are not using Access you do not need to relate the metadata table with your main table, if you are an Access user or have several data sets then you will have to relate them. Later you will find an explanation on why this is special in MS Access
The explanations of the columns of the metadata tables are explained in the annex of this document and as comments in the Access database. We would recommend you to fill as much metadata as possible to describe better your database. And do no forget the logo of your institution, it looks great in the portals then!
Apart of metadata there is also two other things your database should be able to provide. This is a 'UnitID' and a Scientific Name for your objects. The UnitID is a unique identifier for every object in your collection. This is normally the primary key of your main table or a stable number that you use to refer to a unit, for example a barcode You must try to maintain stable this identifier because people can ask you about an object in your database in the future and they will use the UnitID to point to it.
The scientific name is not strictly mandatory but highly recommended. Most of the people do searches based on scientific names so is worth to provide one. Yo have to be sure to have a concatenated version of the name in a single field. So if you have your names atomize in your database you will have to create a new "caching" field where you store the complete name with Authors and Year if you have them. There is no fixed rule in the standard on how to construct the names, is only recommended to provide the best name you can for displaying and for users to do searches on them.
General considerations when mapping to ABCD
There are also some considerations that could be interesting to know when preparing a database to be mapped to ABCD. Especially in data formats and performance.
In ABCD there are some places to store dates, for example collecting date. These dates are always expressed in two ways: a string date where you can map whatever you want, like Between the 3th and 5th of July 1998, and an ISO date with a defined format (check ![]() http://www.w3.org/TR/NOTE-datetime) that makes possible to do searches on them. So when possible it would be very useful that you transform your dates in your database to this format.
http://www.w3.org/TR/NOTE-datetime) that makes possible to do searches on them. So when possible it would be very useful that you transform your dates in your database to this format.
The second consideration is about performance. Sometimes very normalized structures or complicate views provide poor performance later when querying the database, then it could be worth to set up a export routine to a simplified structure. Contact us for more information on this and help, we have some scripts that can be useful for you.
Using the Configuration tool
You are ready to start configuring the software? For this task we provide you with a Configuration Tool that will generate in a graphic and nice way the XML configuration files that control your software.
You probably have already seen it, but if you are quite blind ![]() there is a huge link in the start page pointing to the Configuration tool:
there is a huge link in the start page pointing to the Configuration tool:

This link will point you to the entrance of the configuration tool:
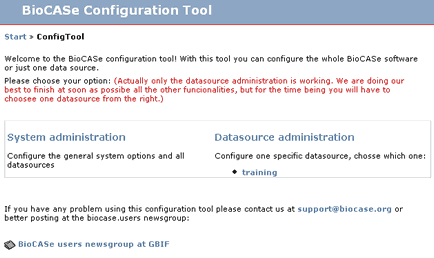
Because the system is created in a way that it can serve several datasources using the same software installation, we will talk often about data sources. A datasource is a database configured on the system. You can see on this page that there is already a datasource created with the name training, this is an example datasource already configured, check the previous chapter for more information.
So, there are general configurations parameters that are common for the whole system and some that are specific for every datasource. So in the left part of the main page you can go to the System administration part or click directly in the name of a datasource in the Datasource administration box to configure it. The option to create new datasources is in the system administration.
To configure things you will need a password. There is a general password for the system administator that gives access to everything - by default it is 'ACDC'. Each datasource can additionally have an individual password. This allows different users on the system.
System Administration
The system administration part contains several sections:
Global configurations: Global configurations for the entire installation. In this section you can update the settings for:
Webserver domain. The domain of your installation incl http, e.g.
![[WWW]](images/moin-www.png) http://ww3.bgbm.org.
http://ww3.bgbm.org.  Remember to chacnge the default
 ![[WWW]](images/moin-www.png) http://localhost setting to your real domain. Even if most of your installation seems to work with localhost, your installation will not work properly from outside!
http://localhost setting to your real domain. Even if most of your installation seems to work with localhost, your installation will not work properly from outside! Base URL of your BPS installation. By default this is /biocase. If you have used the setup.py script to install the software this should be configured already. If your software runs at
![[WWW]](images/moin-www.png) http://ww3.bgbm.org/bps2, this entry should be set to /bps2.
http://ww3.bgbm.org/bps2, this entry should be set to /bps2. Graphviz dot binary. The absolute path on your system to call the dot binary of the optional graphviz package. If you havent installed graphviz go to the Installation page to read more about it or to the libtest.cgi to find a download link.
Admin password. The system wide admin password can be changed here as well
Datasources: Provides an overview about the existing datasources on your installation.
For each datasource the list of configured CMFs/schemas is given as well as the local datasource specific password. At the end of the list there is a form to create a new blank datasource.
Maintanance: Mainanance tools.
The software caches some data and creates serialized objects for faster access. In rare cases these objects can cause problems and with this button you can removes all temporary serialized objects. There is no harm in doing so as all serialized data is derived!
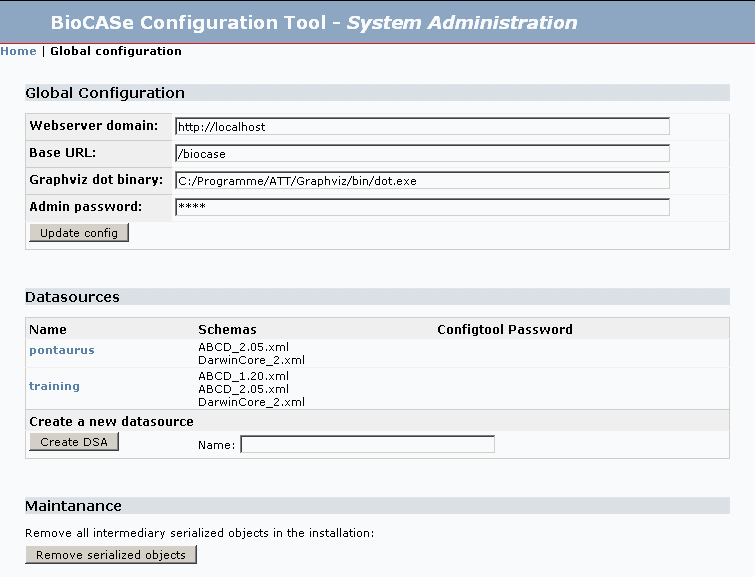
Try to create a new datasource by entering a name without whitespace. After you have done so, click on Home at the top to return to the entrance of the configuration tool. You will see your newly created dsa (Data Source Name).
Datasource overview
For demonstration purposes we will continue configuring the training example, so click in training dsa. You will see something like:
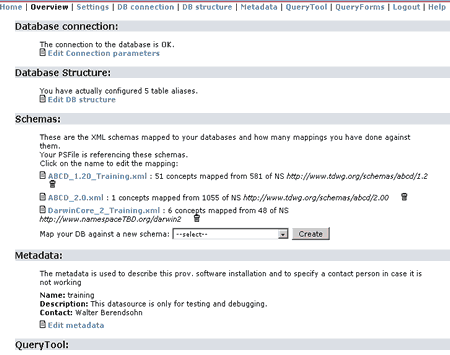
In the top of the screen you can see some direct links:
Home: Returns to the main entrance where you can select a different DSA
Overview: Provides a general overview of the datasource with links to the different mapped schemas
Settings: General configuration parameters
DB connection: Define the database connection parameters and test them.
DB structure: Define the relations between the tables of your database
Metadata: Edit the metadata about this datasource, for example the technical contact, etc.
QueryTool: Optionally configure the QueryTool to provide access to this datasource
QueryForms: For testing purposes we supplied some XML templates for debugging the wrapper
Datasource settings - Settings
Click on Settings and you will see:
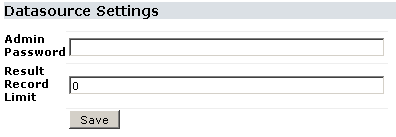
Admin Password: Here change the password to configure this datasource. Remember that there is a general password for all datasources and one for every datasource making possible for different people to administer different datasources in the same wrapper installation.
Result Record Limit: With this number you can specify the maximum records that you want the wrapper to return at once. Limiting the number of records prevents overload in the server produced by queries requesting too much data. The number will depend on your database and server being 100 a good number.
Connection to the database - DB Connection
Click in DB Connection:
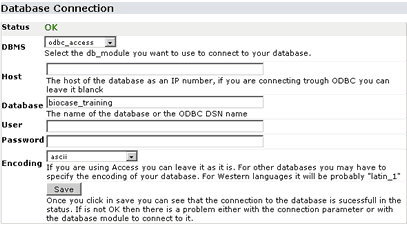
In this page you can set up the parameters to connect to your database. Follow the instructions on the page for more info. If you have problems connecting to your database or your database software is not in the list of DBMS, please contact us for support.
Defining the structure of the database - DB Structure
In this page you will have to specify your database structure so that the wrapper can produce the needed SQL statements to get the data. Because you are accessing the training database you will see that the structure is already declared. If you are setting up a datasource with a known structure maybe you can load a template already for it at the bottom of the page. If not you will have to specify it yourself.
If you have graphviz installed, you will see an image of the graph of the training database: 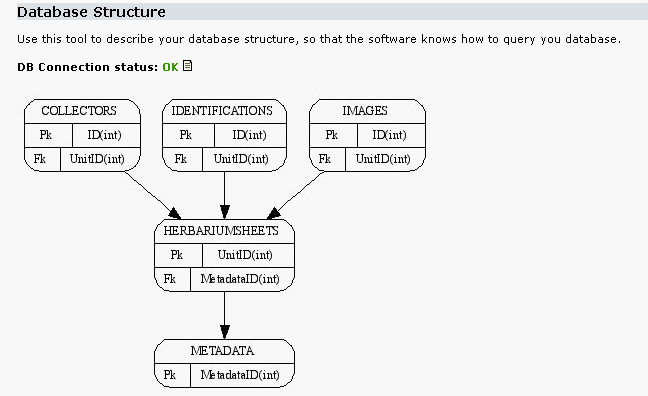
In the screenshot we have reduced the number of tables declared for clarification. The detailed db structure is declared in the following forms:
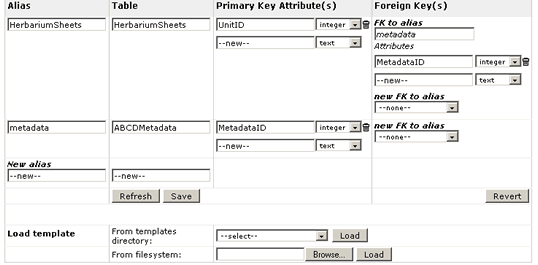
The idea is to declared here the tables that will be used by the wrapper when extracting the data. So in the field table you define the table name, in alias you give it an alias to this table name (normally the same name, but sometimes you need to declare the same table two times with different alias). You also have to specify the Primary Key and foreign keys when existing.
The tool needs to be refreshed from time to time. So for example if you add a new table in the "New alias" then you will have to click Refresh to continue configuring it. The same applies to add primary and foreign keys.
In the example you can see that we have configured the HerbariumSheets and the ABCDMetadata tables. These two tables are related trough a Foreign Key pointing from HerbriumSheets called MetadataID to the ABCDmetadata table.
![]() We suggest you that you import the ABCDmetadata table in your database and configure it in the same way if you are mapping your database to ABCD. This will save you a lot of time then specifying the necessary metadata for ABCD.
We suggest you that you import the ABCDmetadata table in your database and configure it in the same way if you are mapping your database to ABCD. This will save you a lot of time then specifying the necessary metadata for ABCD.
You can specify multiple primary and foreign keys. The only limitation is that a foreign key will always have to point to the primary key of the pointing table.
Once you are finished click on Save to write to the configuration files permanently.
Describing the Data Source with metadata - Metadata
The metadata editor is not ready in this software release. To edit the metadata you will have to do it directly in the XML files. Check the path to the files in this page. We hope to soon include an editor to edit this metadata from here.
![]() In case you are configuring the datasource to publish data through GBIF take note that this metadata will be used (not right now but in the near future) for the registration of the datasource and will be publicly available.
In case you are configuring the datasource to publish data through GBIF take note that this metadata will be used (not right now but in the near future) for the registration of the datasource and will be publicly available.
Mapping the database against different schemas
The next step is to map your database to different XML schemas. The BPS2 needs a separate file for every different schema you want to map to. In the Overview page under the schemas section you can see some already mapped.

As you can see there are already three mapping files to three different schemas for this training database: ABCD 1.2, ABCD 2.05 and Darwin Core 2
If you want to create a new mapping file to a different schema select them from the list and click on Create.
![]() If you want to map your database to a different schema that is not listed here, you can generate new CMF templates for your own xml schema. Please take a look on how to GenerateCmFiles or send it to us and we will process it for you.
If you want to map your database to a different schema that is not listed here, you can generate new CMF templates for your own xml schema. Please take a look on how to GenerateCmFiles or send it to us and we will process it for you.
![]() If you are configuring your software to provide the data to the BioCASe network then we suggest you to map to ABCD 1.2, if you want to do it for GBIF too then it is also recommended to map against ABCD 2.05
If you are configuring your software to provide the data to the BioCASe network then we suggest you to map to ABCD 1.2, if you want to do it for GBIF too then it is also recommended to map against ABCD 2.05
You can take a look directly into the existing mapping for ABCD 1.2 in the training datasource.
The Mapping tool
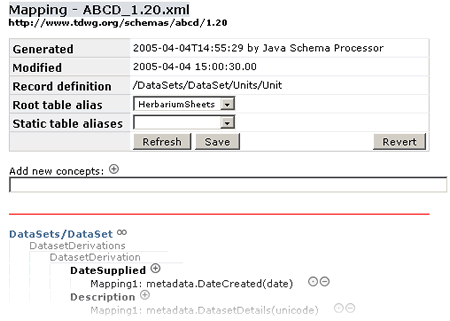
At the top you can see some information about this mapping file.
Root table alias The Root table alias specify the main table of your database. That is the table where the Record definition represents one record. In other words, if you are mapping a Herbarium Sheet database your Root table will be the one where every record represents one Herbarium sheet, normally the central table in the structure.
Static table aliases If you have static data that should be linked to all records in your database, like metadata about a collection or the administrator of the database, you can specify a table-alias here which will be included in all results. If you are familiar with SQL, this is essentially a full outer join between this “static” table and the “root” table. It could be that you don't want to relate your metadata table to the Root one, then you could specify here this metadata table to be included always.
![]() Access does not support Outer Joins so this functionality does not work when using Access. You will always have to relate all your tables or do it using views, ask for more support if you find problems with this.
Access does not support Outer Joins so this functionality does not work when using Access. You will always have to relate all your tables or do it using views, ask for more support if you find problems with this.
The Save button will write to the XML file the actual mapping and the Revert button will go back to the saved version of the file that was in the application before you started editing in this session.
The general idea of mapping a database against a schema is to go selecting concepts (fields) in the schema that you want your database attributes to be map to. When you create a new mapping file you will see that by default the mandatory elements for this schema already appear in the screen in red. These are the first concepts that you have to map to.
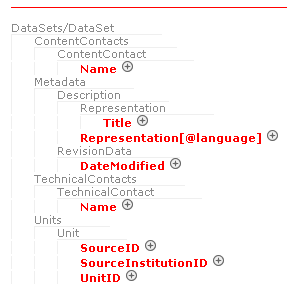
This screenshot is taken from ABCD 2.00 with no mappings. As you see only 7 concepts are mandatory to create an ABCD document. You can see the schema tree where the concepts are. If some things appears in grey is because is not possible to map anything to it, it is am embracing element. In every mapeable element you some signs:
 Add a mapping. Click on it and the mapping editor will be open to create a new mapping.
 Delete a mapping. The actual mapping will be removed.
 Edit the mapping.
The Mapping Editor: editing a single concept mapping
When you, for example click on the add button the mapping editor will appear in a pop-up window:
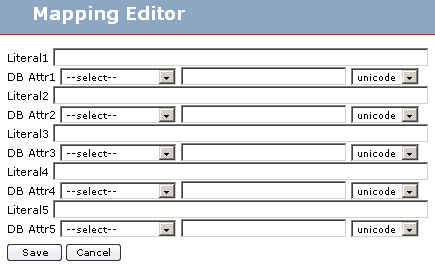
As you can see you can map several literal strings and several database attributes. Normally you will only map one database attribute to one concept in the schema, but here you can represent more complex mappings. If you want to map only one attribute leave blank the Literal1 field and select the table alias and insert the attribute name in DB Attr1. Is important to select correctly the attribute type.
Text: Any kind of text
Int: Integer
Date: Date type in the database
Float: Float type in the database
So for example if you have in your database in two different fields the name and the surname of a collector, you may want to do a mapping like:
Literal1: empty DB Attr 1: 'Collectors' 'Surname' 'unicode' Litera2: ', ' DB Attr 2: 'Collectors' 'Name' 'unicode'
That will concatenate in the result to something like 'Mouse, Mickey'
![]() If you create a mapping that concatenates several database attributes or contains literals then the wrapper will not be able to do searches on it so is not recommended to concatenate here things like a Scientific Name that are very commonly going to be query. If you have your Scientific names atomised in your database is better that you create a new caching field were you concatenate your names and then mapped this new field.
If you create a mapping that concatenates several database attributes or contains literals then the wrapper will not be able to do searches on it so is not recommended to concatenate here things like a Scientific Name that are very commonly going to be query. If you have your Scientific names atomised in your database is better that you create a new caching field were you concatenate your names and then mapped this new field.
Add new concepts from the schema to be mapped
Once that you know how to map your database attributes or literals to concepts in the schema the next step is to find concepts in the schema where to map yours and add them. For this you have to use the Concept Retrieval Interface. To access it click on the  symbol at the top of the interface, where it says Add new concepts. A pop-up window will appear.
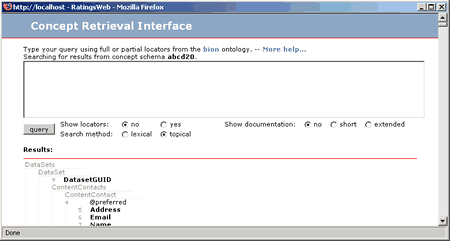
If you know where in the schema the concepts you are looking for are, the you just have to navigate trough the tree and find the concept. Only the concepts in bold are mapeable. The concepts preceded by a @ symbol are attributes in the XML and you can also map them. Once you find the concept you are looking for then click on it and you will see that an identifier it for it would have appear in the Mapping tool window. You can click in several concepts before reloading the Mapping tool window to map them. Once you are finished selecting concepts to map, or you want to map the already selected ones, then close the Concept Retrieval Interface and return to the Mapping Tool. There you will see something like this:

Click on the Refresh button and all these new concepts will be added to the mapping tree where you can add mappings to your database.
So, as you have seen, the idea of mapping is finding concepts in the schema that are suitable for you. You select one or several, return to the Mapping tool window and click on Refresh to view them in the Mapping tree. Then you go one per one specifying where they have to be mapped or with which value.
Find concepts in the schema
Ok. Now you know how to do mappings, but how to find the correct concept in the schema suitable for you? Fortunately there is some help. In the Concept Retrieval Interface you have seen that there is a big box for doing searches. You can read the --More help-- link at the top for more information about how to use this searching engine. Other thing you can do is to turn on the documentation of the schema. Select short or extended and then click on Query to refresh.
Reefer to the Help documentation of the Concept Retrieval Interface for more info on how to use this tool.
Other possibility is always to ask us at ![]() support@biocase.org for info about where to map your database attributes.
support@biocase.org for info about where to map your database attributes.
The use of the DontRepeat clauses
In the Mapping Tool sometimes you will see next to a concept an infinitive symbol like  This symbol indicates that this node of the XML document is a candidate for being repetead. Normally you do not have to worry about this, but just to indicate that sometimes you may want to disable the repetition of a node by inactivating this node. Just click on the
  and it will turn to
You will see when to use it when you detect that the output documents generated by the wrapper are not like you would desire. Contact us for more help on this issue.
Test your configuration
So, you've finished configuring your mapping files? Now you have to test them, or better, test them while you configure them to see that everything is working fine.
There are two ways of testing the wrapper. We have created an specific testing tool for ABCD 1.2 users. If you are using other schema then you will have to use the Query Forms available.
General Testing tool for ABCD providers] Read this chapter only if you are configuring your database for ABCD
If you are mapping against ABCD 1.2 you can use this little testing tool that we have prepared. Go to the Start of the provider software and click on Test the Software. There you will have to choose the datasource that you are using and then click on the several test. You should get from all of them a green message saying No errors found, if there are errors some debugging information will be shown.
You can try to find solutions to the most common errors in our FAQ.
Using the Advance Query Forms to debug problems with the configuration
From the main page go to Utilities->Pywrapper query forms. Click on Manual in the Datasource that you would like to test.
To be completed...
Configuration and personalization of the Query Tool
Please see QueryTool on how to personalize and configure the querytool settings.
Annex 1: Metadata table for ABCD
Following you can find the explanation for every attribute in the template table for ABCD that is provided in the BPS2
MetadataID: Primary key for metadata records
DatasetGUID: A globally unique identifier for the entire data collection the present dataset was derived from. The exact format and/or semantics are still under discussion.
TechnicalContactName: Metadata item normally not used for end-user display. UDDI registry element for GBIF registry.
TechnicalContactEmail: Metadata item normally not used for end-user display. UDDI registry element for GBIF registry.
TechnicalContactPhone: Metadata item normally not used for end-user display. UDDI registry element for GBIF registry.
TechnicalContactAddress: Metadata item normally not used for end-user display. UDDI registry element for GBIF registry.
ContentContactName: Metadata item normally not used for end-user display. UDDI registry element for GBIF registry.
ContentContactEmail: Metadata item normally not used for end-user display. UDDI registry element for GBIF registry.
ContentContactPhone: Metadata item normally not used for end-user display. UDDI registry element for GBIF registry.
ContentContactAddress: Metadata item normally not used for end-user display. UDDI registry element for GBIF registry.
OtherProviderUDDI: The UUID (identifier in the UDDI registry) of another data provider known to serve this dataset.
DatasetTitle: A short, concise title.
DatasetDetails: Free-form text containing a longer description of the project.
DatasetCoverage: Free-form text describing geographic, taxonomic, or other coverage aspects of terminology or descriptions available in the current project.
DatasetURI: URL pointing to an online source related to the current project, which may or may not serve an updated version of the
DatasetIconURI: The URI of an icon/logo symbolizing the project.
DatasetVersionMajor: The major version number ('1' in 1.2) as defined by the content creators.
DatasetCreators: Source for Dublin-Core standard element "Creators", i.e. Author or editor.
DatasetContributors: Source for Dublin-Core standard element"Contributors": General contributors, or translators.
DateCreated: Date/time when the intellectual content (project, term, description, etc.) was created.
DateModified: Date/time when the last modification of the object was made.
OwnerOrganizationName: Label text in a specific language.
OwnerOrganizationAbbrev: Restricted to 50 characters maximum length, including blanks (recommended to be shorter!). Label abbreviations are especially important when displaying information in a tabular format.
OwnerContactPerson: Person to contact
OwnerContactRole: Functional contact name, e.g. "Database administrator", "The Director", etc.
OwnerAddress: Contact addresses
OwnerTelephone: Telephone
OwnerEmail:
OwnerURI: URIs for person or organisation
OwnerLogoURI: URL of a logo image.
IPRText: A conciseIPR declaration, recommended to be as short as possible, but actual length is unconstrained.
IPRDetails: Text of unconstrianed lenght completing the short one
IPRURI: A URL where the IPR statments can be found in the internet. Can replace the long details
CopyrightText:
CopyrightDetails:
CopyrightURI:
TermsOfUseText:
TermsOfUseDetails:
TermsOfUseURI:
DisclaimersText:
DisclaimersDetails:
DisclaimersURI:
LicenseText: To be used if data are placed under a public license (GPL, GFDL, OpenDocument). Placing data under a public license while maintaining copyright is recommended!
LicensesDetails:
LicenseURI:
AcknowledgementsText:
AcknowledgementsDetails:
AcknowledgementsURI:
CitationsText:
CitationsDetails:
CitationsURI:
SourceInstitutionID: Unique identifier (code or name) of the institution holding the original data source (first part of record identifier). In specimen collections, this is normally the institution or private holder of the collection itself.
SourceID: Name or code of the data source (unique within the institution, second part of the record identifier)
RecordBasis: An indication of what the unit record describes.(PreservedSpecimen, LivingSpecimen, FossileSpecimen, OtherSpecimen, HumanObservation, MachineObservation, DrawingOrPhotograph, MultimediaObject)
KindOfUnit: wholeorganisms/antlers /bark /bloodsamples /bones /bulbs /claws /cocoons /DNA /eggs /extracts /feathers /feedingremains /fruits /galls /heads /hooves /horns /leaves /mixed /nests /pellets /pollen /roots /seeds /shells /skins /spores /teeth /wood /other
HigherTaxonRank: In the case of providing higher taxonomy, like providing the family, you can specify here the Rank, for example "Family"